

Maverick44
Youngest old man on TGT.
As promised, here is a full review of my new Bar-Sto .357 Sig barrel. You know it’s gonna be a good one when it’s over 3,800 words long and has not one, but TWO disclaimers in it, lol. Go put the kids to bed, grab a beer, and settle down. This is going to be a long post.
THE GUN, AND THE BARREL
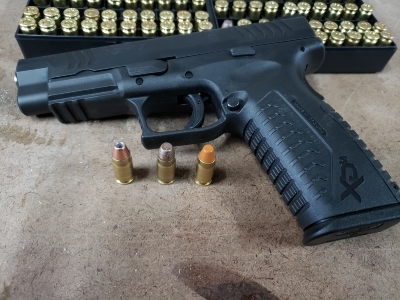
The gun is a 4.5” Springfield Armory XDM-10 in 10mm. As much as I like to talk about it, it's not why we're here, but it's kinda necessary. A barrel doesn't do much if there is no gun around it. It’s a sweet little shooter with a lot of “knockdown” power. The only complaint I have for it is the trigger, which is really not that bad. Its’ a relatively decent striker fire pistol. We all know how those feel. It could be better, but it could be so much worse too. Overall, I’m very happy with the gun and honestly, it’s probably my favorite semi auto. I told you that I like to talk about it.

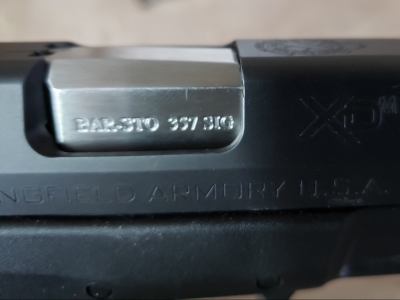
The barrel is a Bar-Sto stainless steel conversion barrel. It’s designed to fit the 4.5” XDM-10 and was about $255 shipped to my door if I recall correctly. Mine is the plain model with a target crown. For a little extra, they offer a few other configurations such as a ported and a threaded version.

Bar-Sto makes all of their barrels to order. The ones that you might see in stock on their website are from cancelled orders. Those will ship immediately. The ones that they don’t already have on hand will have to be made, and that will take some time. I believe that they have an estimated wait time of 4-6 weeks. They got mine done in about a single week though. Also, their customer service is top notch. I had a question for them and got a response from Irv Stone in less than 2 hours. You'll meet Irv later in this post. Anyways, the workmanship on this barrel is absolutely amazing. There is an area or two that was not finished to the point that all of the machine marks were removed, but these are small areas of little importance that will not be visible. Everything else is perfect and beautiful. The barrel I chose is chambered in 357 Sig. It also comes in 40 S&W, as well as 9x25 Dillon. All of which have the same rim diameter, and all of which will work in the same magazine. A barrel is the only thing you need to convert your 10mm to one of these rounds.
The barrels come in two forms. Match target, and semi fit. The match target barrel will have to be fitted by a competent gunsmith. The key word here is competent. Keep Bubba away from your shiny new barrel. The semi fit will drop into the gun 75% of the time without needing fitting. Bar-Sto will fit either to your gun for a fee. Before buying a barrel, I would look at their process and decide whether you want the barrel fitted by them or not before you buy it. The cost to fit a semi fit barrel is $65.00 not including shipping. The cost for a match target barrel fitting is $215.00 - $265.00 depending on the gun type and does not include shipping. Having them fit a barrel will require you to send the gun to them, and the return shipping will be $60-$90. Also, if I recall correctly, there was some important information that comes in a packet with the barrel regarding their fitting costs. Read it before you touch the barrel. If you decide to have them fit the barrel at a later date, I believe there were some extra costs involved depending on what you did/didn’t do with the barrel. I do not remember where I put that packet otherwise, I’d post that information here.
THE FITTING PROCESS
Warning. Before I continue, just know that this is not something you want to screw up. There are very real consequences and dangers to doing this. If you do not have a good understanding of what you are doing, then DON’T DO IT. I spent quite a bit of time looking up information from numerous sources and comparing it to information from other sources just to make sure I was doing this correctly. I am not a gunsmith by any means, and I took my safety into my own hands. If you choose to do this, you do so with the understanding that you are taking your safety into your own hands. Neither I nor this forum are responsible for any damage, injury, or death that results from doing this job incorrectly. This guide is meant to show you how I did this job. It might be the right way, or it might not be. You are solely responsible for deciding that. DO NOT USE THE FOLLOWING AS A GUIDE FOR DOING THIS YOURSELF.
Remember how I said that 75% of all semi fit barrels will drop freely into the gun? Guess who got one of the 25% that won't? There is not a competent gunsmith near me unless I wanted to drive 2-3 hours, so I put my big boy panties on and picked up the finest file I could find. You want to take off as little material at a time as possible when you do this sort of thing. I also want to stress that while this is an easy job, it’s not for those of us who are… less than good with our hands. Yeah, that’s the nice way to say it. If you don’t know how to file something carefully, and can’t keep something perfectly square and flat, then you might want to give Bar-Sto a call about getting them to do this job. If you can stay focused and be patient and can resist the urge to break out the Dremel, then you’re golden.
Now for the actual fitting process. Like I said, I picked up the finest file that I could fine. It would have been even better if I had had a good honing stone. Finding one that’s got a 90-degree corner on it is a huge plus. The area of the barrel that is being worked on needs to be absolutely perfectly flat and square. As you can see below, I used a square file, and I ground one side of the file so that it would be smooth.

Material needed to be removed from the vertical surface on the barrel that locks into the slide, NOT the horizontal surface. That is a big no no, and generally just bad juju. There is no way I could possible stress that enough. Don't do it bruh! Now, for those who have any reservations about modifying a perfectly good file, just remember this. Files are cheap, that barrel was expensive, and the cost of facial reconstruction surgery is about $184,000. I don’t have that kind of money and Obama lied to me about affordable healthcare.
I used a black Sharpie to mark the area that needed to be filed. This allows me to see how much material I’m taking away, and the see if I am putting too much pressure on either side of the fire area. Again, rounding over this area is not good. It needs to be kept as perfectly flat and straight as possible. The area with Sharpie is the ONLY area that needs to be filed on. Like I said, filing the surface that is perpendicular to the one marked with a Sharpie is a very bad idea. Every time I completely removed the Sharpie from the surface, I would re-coat it. Sharpie is basically the poor man's layout fluid. It was a tremendous help during this job.

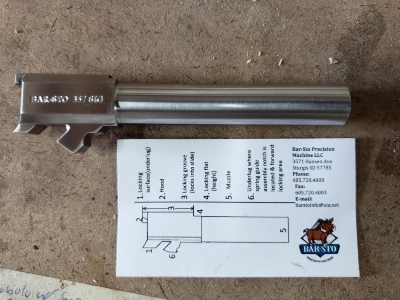
Here is a picture of a reference card that Bar-Sto sent with the barrel. In order to get the barrel fitted, you have to reduce the length of #3 so that it will fit into the cutout in the slide. I did this by shortening the length at point #4. DO NOT file on point #2, which is the hood. Shortening this will change the headspace. It is already set where it needs to be, so changing it will cause problems. Problems that nobody in their right mind would want.

In some instances, material might need to be removed from the locking surface on the underside of the barrel (point #1). I did not have to do this on my barrel. Here is a video from Bar-Sto that does an excellent job of explaining where you need to remove material from. I told you that you'd meet Irv later in this post.
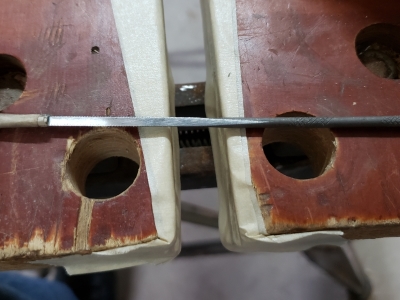
As you can see in this picture, the barrel will not fit into the cut out in the slide. It's actually wedged in there pretty good. Material needs to be removed from point #4 in order to make it fit. I was very careful to SLOWLY and CAREFULLY remove material from the surface and to check the fit frequently. You honestly cannot test the fit too frequently. Towards the end of the fitting process, my barrel went from being just a bit too tight to being a perfect fit in just a few quick passes with the file. It doesn't take much.

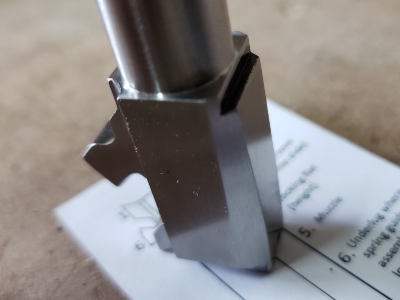
In this next picture, you can see that a proper fit has been achieved. The barrel is fully locked into the slide, and there is very little “wiggle room” between the forward and rear locking surfaces. It is a noticeably tighter fit than the factory barrel, but not so tight that it would impede the function of the firearm. From what I understand, this is exactly what you want.

At the end of this process, it is prudent to ensure that the gun actually functions with this new barrel. It needs to lock fully into the slide, and the gun needs to be able to cycle and reset with 100% reliability.
THE GUN, AND THE BARREL
The gun is a 4.5” Springfield Armory XDM-10 in 10mm. As much as I like to talk about it, it's not why we're here, but it's kinda necessary. A barrel doesn't do much if there is no gun around it. It’s a sweet little shooter with a lot of “knockdown” power. The only complaint I have for it is the trigger, which is really not that bad. Its’ a relatively decent striker fire pistol. We all know how those feel. It could be better, but it could be so much worse too. Overall, I’m very happy with the gun and honestly, it’s probably my favorite semi auto. I told you that I like to talk about it.
The barrel is a Bar-Sto stainless steel conversion barrel. It’s designed to fit the 4.5” XDM-10 and was about $255 shipped to my door if I recall correctly. Mine is the plain model with a target crown. For a little extra, they offer a few other configurations such as a ported and a threaded version.
Bar-Sto makes all of their barrels to order. The ones that you might see in stock on their website are from cancelled orders. Those will ship immediately. The ones that they don’t already have on hand will have to be made, and that will take some time. I believe that they have an estimated wait time of 4-6 weeks. They got mine done in about a single week though. Also, their customer service is top notch. I had a question for them and got a response from Irv Stone in less than 2 hours. You'll meet Irv later in this post. Anyways, the workmanship on this barrel is absolutely amazing. There is an area or two that was not finished to the point that all of the machine marks were removed, but these are small areas of little importance that will not be visible. Everything else is perfect and beautiful. The barrel I chose is chambered in 357 Sig. It also comes in 40 S&W, as well as 9x25 Dillon. All of which have the same rim diameter, and all of which will work in the same magazine. A barrel is the only thing you need to convert your 10mm to one of these rounds.
The barrels come in two forms. Match target, and semi fit. The match target barrel will have to be fitted by a competent gunsmith. The key word here is competent. Keep Bubba away from your shiny new barrel. The semi fit will drop into the gun 75% of the time without needing fitting. Bar-Sto will fit either to your gun for a fee. Before buying a barrel, I would look at their process and decide whether you want the barrel fitted by them or not before you buy it. The cost to fit a semi fit barrel is $65.00 not including shipping. The cost for a match target barrel fitting is $215.00 - $265.00 depending on the gun type and does not include shipping. Having them fit a barrel will require you to send the gun to them, and the return shipping will be $60-$90. Also, if I recall correctly, there was some important information that comes in a packet with the barrel regarding their fitting costs. Read it before you touch the barrel. If you decide to have them fit the barrel at a later date, I believe there were some extra costs involved depending on what you did/didn’t do with the barrel. I do not remember where I put that packet otherwise, I’d post that information here.
THE FITTING PROCESS
Warning. Before I continue, just know that this is not something you want to screw up. There are very real consequences and dangers to doing this. If you do not have a good understanding of what you are doing, then DON’T DO IT. I spent quite a bit of time looking up information from numerous sources and comparing it to information from other sources just to make sure I was doing this correctly. I am not a gunsmith by any means, and I took my safety into my own hands. If you choose to do this, you do so with the understanding that you are taking your safety into your own hands. Neither I nor this forum are responsible for any damage, injury, or death that results from doing this job incorrectly. This guide is meant to show you how I did this job. It might be the right way, or it might not be. You are solely responsible for deciding that. DO NOT USE THE FOLLOWING AS A GUIDE FOR DOING THIS YOURSELF.
Remember how I said that 75% of all semi fit barrels will drop freely into the gun? Guess who got one of the 25% that won't? There is not a competent gunsmith near me unless I wanted to drive 2-3 hours, so I put my big boy panties on and picked up the finest file I could find. You want to take off as little material at a time as possible when you do this sort of thing. I also want to stress that while this is an easy job, it’s not for those of us who are… less than good with our hands. Yeah, that’s the nice way to say it. If you don’t know how to file something carefully, and can’t keep something perfectly square and flat, then you might want to give Bar-Sto a call about getting them to do this job. If you can stay focused and be patient and can resist the urge to break out the Dremel, then you’re golden.
Now for the actual fitting process. Like I said, I picked up the finest file that I could fine. It would have been even better if I had had a good honing stone. Finding one that’s got a 90-degree corner on it is a huge plus. The area of the barrel that is being worked on needs to be absolutely perfectly flat and square. As you can see below, I used a square file, and I ground one side of the file so that it would be smooth.
Material needed to be removed from the vertical surface on the barrel that locks into the slide, NOT the horizontal surface. That is a big no no, and generally just bad juju. There is no way I could possible stress that enough. Don't do it bruh! Now, for those who have any reservations about modifying a perfectly good file, just remember this. Files are cheap, that barrel was expensive, and the cost of facial reconstruction surgery is about $184,000. I don’t have that kind of money and Obama lied to me about affordable healthcare.
I used a black Sharpie to mark the area that needed to be filed. This allows me to see how much material I’m taking away, and the see if I am putting too much pressure on either side of the fire area. Again, rounding over this area is not good. It needs to be kept as perfectly flat and straight as possible. The area with Sharpie is the ONLY area that needs to be filed on. Like I said, filing the surface that is perpendicular to the one marked with a Sharpie is a very bad idea. Every time I completely removed the Sharpie from the surface, I would re-coat it. Sharpie is basically the poor man's layout fluid. It was a tremendous help during this job.
Here is a picture of a reference card that Bar-Sto sent with the barrel. In order to get the barrel fitted, you have to reduce the length of #3 so that it will fit into the cutout in the slide. I did this by shortening the length at point #4. DO NOT file on point #2, which is the hood. Shortening this will change the headspace. It is already set where it needs to be, so changing it will cause problems. Problems that nobody in their right mind would want.
In some instances, material might need to be removed from the locking surface on the underside of the barrel (point #1). I did not have to do this on my barrel. Here is a video from Bar-Sto that does an excellent job of explaining where you need to remove material from. I told you that you'd meet Irv later in this post.
As you can see in this picture, the barrel will not fit into the cut out in the slide. It's actually wedged in there pretty good. Material needs to be removed from point #4 in order to make it fit. I was very careful to SLOWLY and CAREFULLY remove material from the surface and to check the fit frequently. You honestly cannot test the fit too frequently. Towards the end of the fitting process, my barrel went from being just a bit too tight to being a perfect fit in just a few quick passes with the file. It doesn't take much.
In this next picture, you can see that a proper fit has been achieved. The barrel is fully locked into the slide, and there is very little “wiggle room” between the forward and rear locking surfaces. It is a noticeably tighter fit than the factory barrel, but not so tight that it would impede the function of the firearm. From what I understand, this is exactly what you want.
At the end of this process, it is prudent to ensure that the gun actually functions with this new barrel. It needs to lock fully into the slide, and the gun needs to be able to cycle and reset with 100% reliability.
.png)
Attachments
-
 085857b9eb51b01b3c73efe4c51debf1.jpg146.1 KB · Views: 791
 -
 8d478e8ec92ee6be7b23bad63b40910c.jpg146.2 KB · Views: 887
 -
 3a80c76b1f46570155b97017ee1c28f6.jpg57.4 KB · Views: 608
 -
 388c55ad457041d7b3c0f397a3c48d39.jpg29.2 KB · Views: 620
 -
 75423077eae67b3f29d9e34414759d21.jpg31 KB · Views: 555
 -
 b2fde5fb6e61801c34d9ce522b7d3e49.jpg33.2 KB · Views: 619
 -
 513853a1aae904998d566a6433487916.jpg30.9 KB · Views: 589
Last edited:


