Military Camp

RC Build: Clipped Wing Cub

The #1 community for Gun Owners in Texas

Member Benefits:

  • Fewer Ads!
  • Discuss all aspects of firearm ownership
  • Discuss anti-gun legislation
  • Buy, sell, and trade in the classified section
  • Chat with Local gun shops, ranges, trainers & other businesses
  • Discover free outdoor shooting areas
  • View up to date on firearm-related events
  • Share photos & video with other members
  • ...and so much more!
  • Younggun

    Certified Jackass
    TGT Supporter
    Local Business Supporter
    Rating - 100%
    6   0   0
    Jul 31, 2011
    53,750
    96
    hill co.
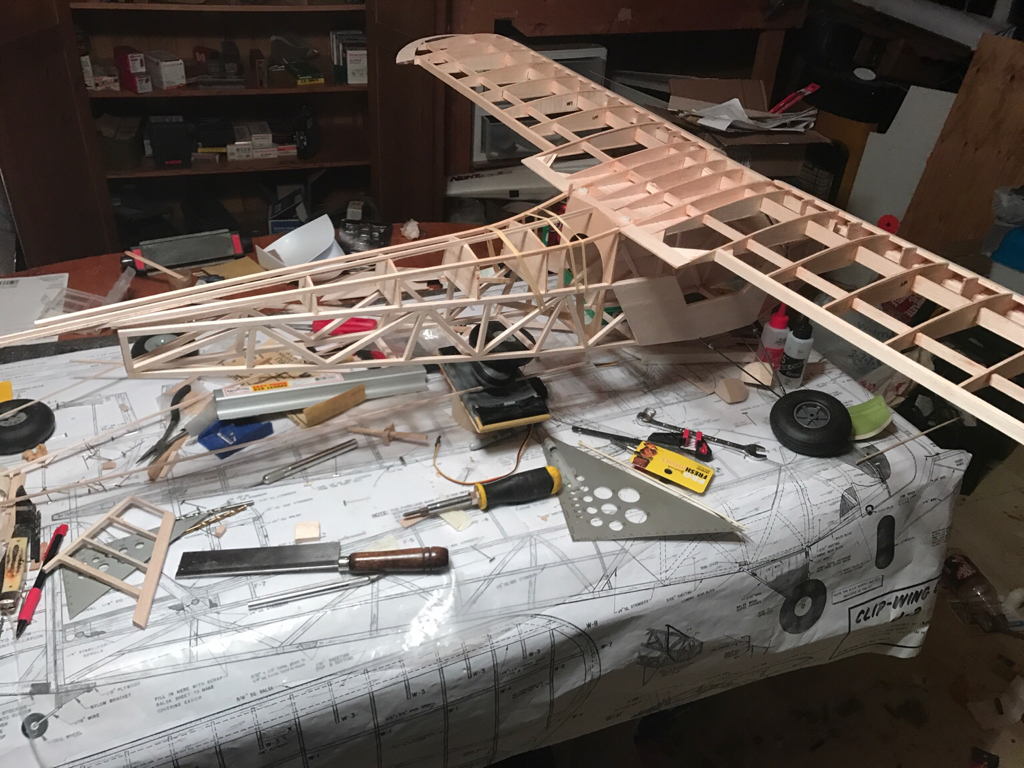
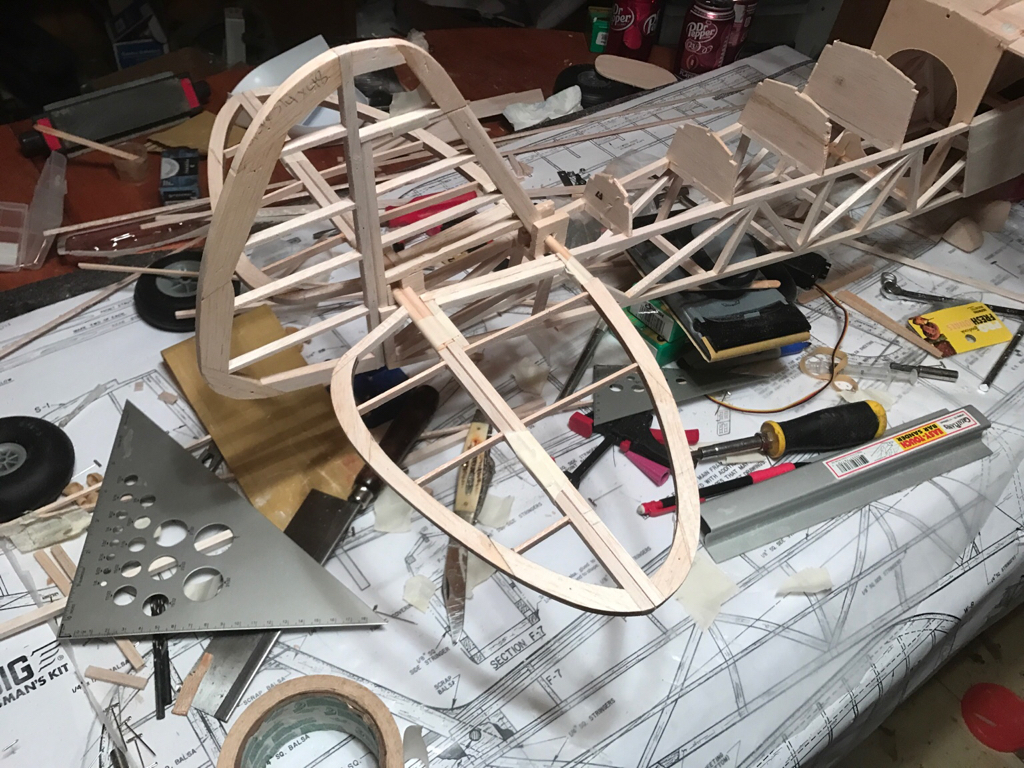
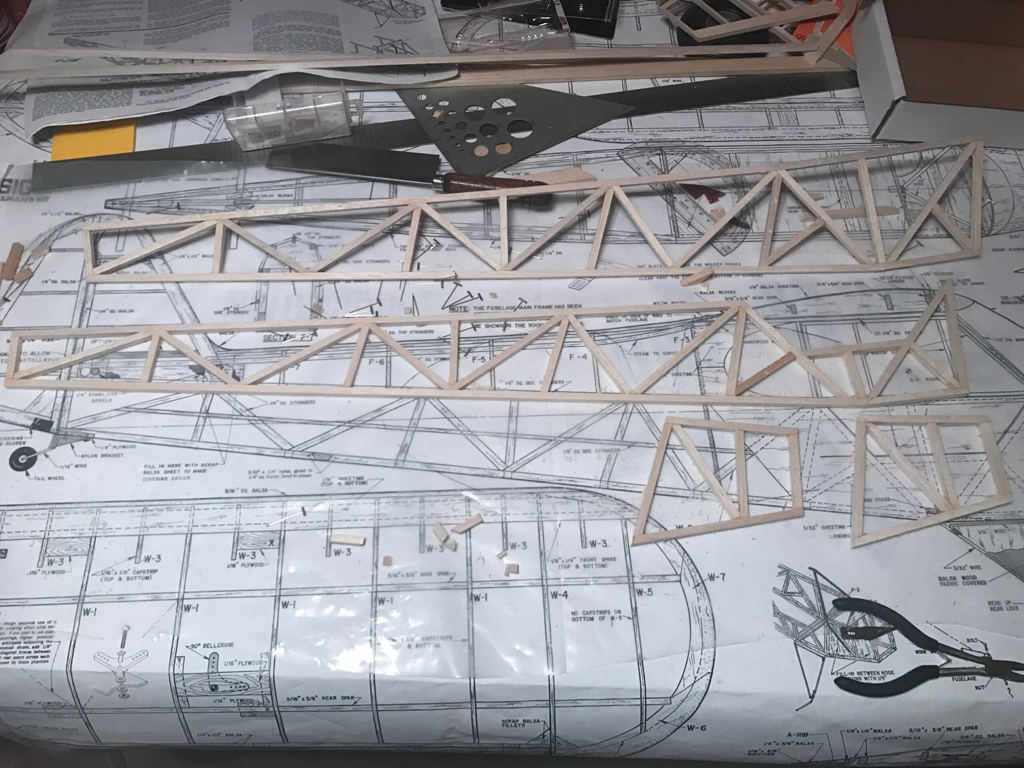
    Good progress this evening. Both sides of the fuselage are framed up, glued, and sanded. Little bit glad to have this portion out of the way.

    4ecf107d41c55afce466233b2e6d1d62.jpg


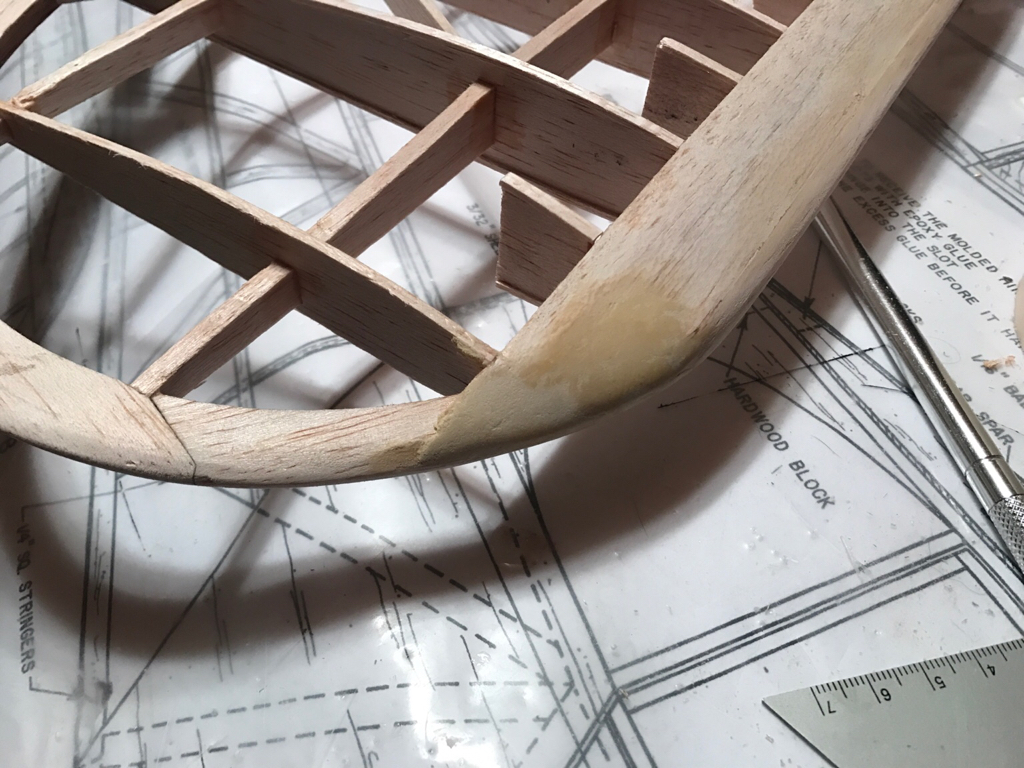
    Probably could have saved some time by using epoxy and not needing as good a fit for the pieces, but by keeping to wood glue through this section I saved a ton of weight. It's very strong for being made of weak balsa.


    Sent from my iPhone using Tapatalk
    Venture Surplus ad
     

    Younggun

    Certified Jackass
    TGT Supporter
    Local Business Supporter
    Rating - 100%
    6   0   0
    Jul 31, 2011
    53,750
    96
    hill co.
    It's starting to look like something now!

    25bdddd107ccb8c82998c794f53c7cce.jpg


    The front of the nose is just slightly out of square, but doesn't look like it's at any kind of angle. Seems the basic rules of geometry would throw it off simply based on the way it's built. Not gonna worry about it since the cowl will cover it anyways.

    Cabin frame comes next, and it looks like the difficulty will step up a bit moving forward. Fingers crossed.


    Sent from my iPhone using Tapatalk
     

    Younggun

    Certified Jackass
    TGT Supporter
    Local Business Supporter
    Rating - 100%
    6   0   0
    Jul 31, 2011
    53,750
    96
    hill co.
    Heh. Told miranda last night that if I wanted to turn it in to a boat now would be the time.


    Sent from my iPhone using Tapatalk
     

    Younggun

    Certified Jackass
    TGT Supporter
    Local Business Supporter
    Rating - 100%
    6   0   0
    Jul 31, 2011
    53,750
    96
    hill co.
    Well, I'm stuck.

    Need to finish sheeting the wing before I go forward. Need to get the aileron servo situation figured out before I finish sheeting the wing.

    I really don't care for way it's done in the book. I think it's a little overly complicated using 1 servo and a bell crank system. It also makes it harder to get the ailerons adjusted properly. I usually go with a 2 servo setup connected directly to the aileron.

    Problem is the wing profile is pretty thin and doesn't allow for the same setup I've used in the past. I can order some smaller servos that would be fairly expensive, or do a little more framing in the wing and turn the servo on its side. Gonna increase the weight by a couple ounces before it's figured out I think.


    Sent from my iPhone using Tapatalk
     

    Younggun

    Certified Jackass
    TGT Supporter
    Local Business Supporter
    Rating - 100%
    6   0   0
    Jul 31, 2011
    53,750
    96
    hill co.
    I've decided how I'm going to mount the servos but need to order some 1/16" plywood. In the mean time I've started working on building up the landing gear.

    It's made up of 1/8" wire and some smaller support pieces that give it a scale Cub look as well as beef it up.

    Wires were pre-bent to be close, got them lined up and fine tuned everything. Scuffed up the areas where the pieces came together and wiped down with fuel alcohol. Stripped the copper wire from an old DC wall charger and used the thin wire to tightly wrap the joints then soldered over it. Got about 2/3 of it done before I got called out to work.

    680cb7f5c07b4dae6c87a59e7b203dec.jpg


    e8e123ad1ace2b5200fece109fc2a3d9.jpg


    Sent from my iPhone using Tapatalk
     

    Younggun

    Certified Jackass
    TGT Supporter
    Local Business Supporter
    Rating - 100%
    6   0   0
    Jul 31, 2011
    53,750
    96
    hill co.
    My landings aren't always pretty, I'm sure it will get tested, lol.


    One complaint I've heard about this landing gear is it's stiffness. It resembles scale landing gear in every way except there's no give once it's all soldered together.

    I've got an idea rolling around in my head to incorporate a hinge and spring shock absorber setup.

    I've looked at some RC car and truck shocks but the work in the opposite direction that I need. Will have to figure out if it will be easier to modify a set of car shocks or build from scratch.


    Sent from my iPhone using Tapatalk
     

    Younggun

    Certified Jackass
    TGT Supporter
    Local Business Supporter
    Rating - 100%
    6   0   0
    Jul 31, 2011
    53,750
    96
    hill co.
    Yeah. Gonna do some more thinking on it. If I start hacking up the stock gear there's no turning back.

    Not a lot of progress today. Finished soldering the landing gear and got the cabin framed up. Slid a few different sets of tires on for comparison and set the wings on top to see how it looks.

    5284789975301b6ea02c670c259268db.jpg


    Shown with 4" tires, 3" would be accurate scale. Considering going with 5-6" tires since I'm going for a bush plane look and ability (landing in the pasture) and have already hacked the rudder in to a super Cub profile. Not terribly concerned with keeping it perfectly scale at this point, lol.


    Sent from my iPhone using Tapatalk
     

    Younggun

    Certified Jackass
    TGT Supporter
    Local Business Supporter
    Rating - 100%
    6   0   0
    Jul 31, 2011
    53,750
    96
    hill co.
    Stands about 13.5" if level from the table to the top of the wing.


    Sent from my iPhone using Tapatalk
     

    Younggun

    Certified Jackass
    TGT Supporter
    Local Business Supporter
    Rating - 100%
    6   0   0
    Jul 31, 2011
    53,750
    96
    hill co.
    Some work done today. Got the rods that secure the front of the wing epoxied in place, drilled and tapped holes for the trailing edge. Glued in formers on the back of the fuse and wet the stringers so they will form and take some tension off them.

    Struggling to figure out how the rudder, elevator, and stabilizers are meant to be put in place. The drawings a convoluted in that section and the book is no help at all.

    c9ea93781d0474074b455072781fd934.jpg


    Sent from my iPhone using Tapatalk
     

    Younggun

    Certified Jackass
    TGT Supporter
    Local Business Supporter
    Rating - 100%
    6   0   0
    Jul 31, 2011
    53,750
    96
    hill co.
    Not much progress on the tail. While I let it roll around in the back of my head I finished up the wing. Built removable trays for the servos, installed some brass tubes in the planked sections to make replacement easier (I can feed wires through the blind areas), finished the balsa covering, added gussets, used some filler to make the transition from the leading edge to the tips nicer, and did the finish sanding. It's pretty much complete except for the covering. I ordered some 6" extensions for the servos but should have got 12".

    I also did the finish sanding on the tail feathers. I think I've got it figured out now. I'll have to cover the elevator before I start, put it in place, epoxy in the vertical stabilizer with 2 dowels that will have to be set right and then finally install the horizontal stabilizer as about the last step in the build. It doesn't go on until the rest of the plane of covered.

    I'm trying to wait because once it's on the rudder will have very little support and can be easily broken until the tail is complete.

    Engine should be here mid week. I'll start on the front end, get the cowl ready, and measure to see how far back I need to move the firewall to keep everything in the right spot. The plane should fly scale on a .25 or so 2 stroke, I'm going with a .56 4 stroke. Hoping for near unlimited verticals and the ability to get off the runway in <15'.

    Once the engine is in I'll work on the servo tray and try to make up for any extra nose weight by moving the rudder/elevator/throttle servos back behind CG.


    Sent from my iPhone using Tapatalk
     

    Younggun

    Certified Jackass
    TGT Supporter
    Local Business Supporter
    Rating - 100%
    6   0   0
    Jul 31, 2011
    53,750
    96
    hill co.
    Kept tinkering today. Hinged the ailerons, installed control horns, and got push rods made. Pretty much all that's left is covering and gluing the hinges in. Gotta get the 12" leads before I cover it.

    Nothing on this plane just goes together. Just mounting the ailerons ended up taking much longer than usual because of how basic the kit is. It's definitely one for someone who wants to have a hand in every step of the process and loves sanding.


    Sent from my iPhone using Tapatalk
     

    Younggun

    Certified Jackass
    TGT Supporter
    Local Business Supporter
    Rating - 100%
    6   0   0
    Jul 31, 2011
    53,750
    96
    hill co.
    Tail surfaces hinged but nothing glued

    8616ba7f328fb5da1a1777730aa27b22.jpg


    Servo trays built from spruce and 1/16" ply, removable for maintenance

    2e79d73d7bb52faf482d50b79eef76e0.jpg


    12657c899ed5fc810b98efe3d6196d8f.jpg


    f72eae57f81c37fdcff6661b7560e74a.jpg


    Ailerons are only recessed on the underside of the wing. Started as a piece of rectangle stock and shave/sanded to relieve it and allow the aileron to swing down. Used pin hinged instead of the cheap plastic ones that came with the kit. Installed with the hinge joint above the wing. Kind of a pain but works much better than what it came with.
    50e471ac3f6d752a1f50988d09a2223c.jpg


    935629c10b933124bd925dd21c93eb8e.jpg


    2d138cbcc5ed5182428a844a603416e1.jpg


    You can also see all the bracing installed diagonally across the wing in the last pic. The model is meant to be covered with doped cloth which would add a lot of strength. I think it would be fine with the intended size but since I'm overpowering it I want to make sure the wings don't get stressed.


    Sent from my iPhone using Tapatalk
     

    Younggun

    Certified Jackass
    TGT Supporter
    Local Business Supporter
    Rating - 100%
    6   0   0
    Jul 31, 2011
    53,750
    96
    hill co.
    Filled and sanded wing tips for transition from leading edge to tip.

    Before and after.

    d45b5a94ef7192f1c4475d7ffd20d6d1.jpg


    83c7abb5b9151edb219ab8f1d71ab9c8.jpg


    Sent from my iPhone using Tapatalk
     
    Top Bottom